
목차
1.개요
2. Enemy(Monster) 클래스 구조
3. Monster 기능 컴포넌트
4. Monster 클래스별 컴포넌트 구성
5. 몬스터 컴포넌트 활용
1. 개요
프로젝트에서 적(몬스터) 구현 역할을 맡았고 특히 AI 구현은 복잡합니다. AI Controller, Behavior Tree, 그리고 Black Board에서는 각 몬스터의 기능을 활용하기 때문에 몬스터 클래스 구조부터 정리하고자 합니다.
2. Enemy(Monster) 클래스 구조

몬스터 타입(일반, 보스) 별 각 기능을 구상하며 위와 같이 클래스를 설계하였습니다.
3. 몬스터 컴포넌트
- 공격 관련
- MonsterAttackComponent (일반 공격)
- 상태 관련
- MonsterStatComponent (스탯 관리)
- HitReactionComponent (피격 반응)
- BerserkModeComponent (광폭화 모드)
- 스킬 관련
- BaseSkillComponent (기본 스킬 추상 클래스)
- JumpAttackComponent (점프 공격)
- ChargeAttackComponent (돌진 공격)
- BaseSkillComponent (기본 스킬 추상 클래스)
MonstStatComponent(몬스터 스테이터스 컴포넌트) 코드 예시
//MonsterStatComponent.h
#pragma once

#include "CoreMinimal.h"
#include "Components/ActorComponent.h"
#include "MonsterStatComponent.generated.h"


UCLASS( ClassGroup=(Custom), meta=(BlueprintSpawnableComponent) )
class PEPCCINE_API UMonsterStatComponent : public UActorComponent
{
	GENERATED_BODY()

public:
	UMonsterStatComponent();

protected:
	virtual void BeginPlay() override;

public:
    UPROPERTY(EditAnywhere, BlueprintReadWrite, Category = "Stat")
    float MaxHealth = 100.0f;
    UPROPERTY(VisibleAnywhere, BlueprintReadOnly, Category = "Stat")
    float CurrentHealth;
    UPROPERTY(EditAnywhere, BlueprintReadWrite, Category = "Stat")
    float Attack = 10.0f;
    UPROPERTY(EditAnywhere, BlueprintReadWrite, Category = "Stat")
    float Defense = 5.0f;
    UPROPERTY(EditAnywhere, BlueprintReadWrite, Category = "Stat")
    float Speed = 300.0f;

    UFUNCTION(BlueprintCallable, Category = "Stat")
    void DecreaseHealth(float Amount);
    UFUNCTION(BlueprintCallable, Category = "Stat")
    void IncreaseHealth(float Amount);
    UFUNCTION(BlueprintCallable, Category = "Stat")

    FORCEINLINE void IncreaseATK(float Amount) { Attack = Attack * Amount; }
    FORCEINLINE void IncreaseDEF(float Amount) { Defense = Defense * Amount; }
    FORCEINLINE void IncreaseSPD(float Amount){ Speed = Speed * Amount; }

    UFUNCTION(BlueprintPure, Category = "Stat")
    bool IsDead() const;
};
//MonsterStatComponent.cpp
#include "Monster/Component/MonsterStatComponent.h"
UMonsterStatComponent::UMonsterStatComponent()
{
PrimaryComponentTick.bCanEverTick = false;
CurrentHealth = MaxHealth; // 초기 체력 = 최대 체력
}
void UMonsterStatComponent::BeginPlay()
{
Super::BeginPlay();
}
void UMonsterStatComponent::DecreaseHealth(float Amount)
{
float FinalDamage = FMath::Max(Amount - Defense, 1.0f); // 방어력 적용, 최소 데미지 1
CurrentHealth = FMath::Max(CurrentHealth - FinalDamage, 0.0f);
}
void UMonsterStatComponent::IncreaseHealth(float Amount)
{
CurrentHealth = FMath::Min(CurrentHealth + Amount, MaxHealth);
}
bool UMonsterStatComponent::IsDead() const
{
return CurrentHealth <= 0.0f;
}
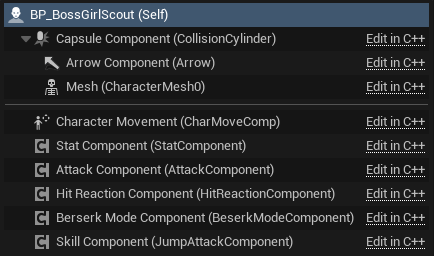
4. 몬스터 클래스별 컴포넌트 구성
- BaseMonster
- MonsterAttackComponent
- MonsterStatComponent
- HitReactionComponent

- BossMonster
- BerserkModeComponent
- JumpAttackComponent
- ChargeAttackComponent
5. 몬스터 컴포넌트 활용
- AI Controller에서 사용
- BehaviorTree 내 BTTask에서 호출

✏️ 스스로 Enemy AI의 이해를 돕기 위해 PPT를 활용하여 시각화해보았습니다. 어렵네요 ..ㅋㅋㅋ
'TIL > C++와 UE' 카테고리의 다른 글
| 작성중 (0) | 2025.02.26 |
|---|---|
| 머티리얼 조작 (0) | 2025.02.25 |
| 언리얼 엔진 AI 행동 제어 시스템 (0) | 2025.02.17 |
| 파티클 시스템 (0) | 2025.02.11 |
| 게임 메뉴 UI 디자인 (0) | 2025.02.07 |